
How to Fix a Slice in Golf: The Complete Guide
If you’ve ever watched your ball curve dramatically to the right (for right-handed golfers), you know the frustration of a slice. It’s the most common miss in golf, affecting an estimated 90% of amateur players. The good news? Learning how to fix a slice in golf is entirely achievable with the right understanding and practice drills.
In this complete guide, we’ll break down exactly what causes a slice, then give you 7 proven drills and fixes that will have you hitting straighter shots in no time.
What Causes a Slice in Golf?
Before diving into the fixes, it’s crucial to understand the mechanics behind a slice. A slice occurs due to two primary factors working together:
1. Open Clubface at Impact
The clubface is the primary factor determining where your ball starts and curves. When the clubface is open (pointing right of your target for right-handers) at impact, it imparts clockwise sidespin on the ball. This sidespin causes the ball to curve dramatically to the right during flight.
An open clubface can result from:
- A weak grip (hands rotated too far left on the club)
- Poor wrist action through impact
- Failing to release the club properly
- Gripping the club too tightly
2. Out-to-In Swing Path
The swing path refers to the direction your clubhead travels through impact. An out-to-in path (also called “over the top”) means the club approaches the ball from outside the target line and cuts across it. Combined with an open face, this creates the classic slice with that weak, curving ball flight.
Common causes of an out-to-in path include:
- Starting the downswing with the shoulders
- Coming “over the top” due to poor sequencing
- Standing too close to the ball
- An overly steep backswing
7 Proven Drills to Fix Your Slice
Now that you understand the mechanics, let’s get into the actionable fixes. These drills address both the clubface and swing path issues that cause slicing.
Drill 1: Strengthen Your Grip
A stronger grip is often the quickest fix for a slice. Here’s how to do it:
Step-by-step instructions:
- Hold the club out in front of you with your left hand (for right-handers)
- Rotate your left hand clockwise on the grip until you can see 2-3 knuckles when looking down
- Place your right hand on the club so the palm faces the target
- The “V” formed by your right thumb and forefinger should point to your right shoulder
- Maintain light grip pressure – about 4 on a scale of 1-10
This stronger grip position naturally helps close the clubface at impact, reducing that slice-producing open face.
Drill 2: The Headcover Gate Drill
This drill instantly provides feedback on your swing path.
Step-by-step instructions:
- Place a headcover about 6 inches behind your ball, slightly outside your target line
- Place another headcover about 6 inches in front of the ball, slightly inside your target line
- This creates a “gate” that your club must travel through
- Make swings focusing on missing the back headcover (forces inside approach)
- If you hit the back headcover, you’re coming over the top
Practice this drill with half-swings first, gradually building to full swings as your path improves.
Drill 3: The Alignment Stick Under Arm Drill
This drill helps maintain connection and prevents the arms from separating from the body, a common cause of an over-the-top move.
Step-by-step instructions:
- Place an alignment stick across your chest, under both armpits
- Take your normal address position
- Make slow practice swings keeping the stick in place
- Focus on turning your body rather than lifting your arms
- The stick should stay connected throughout the backswing
- On the downswing, feel your arms staying close to your body
This drill promotes proper body rotation and keeps your arms synced with your torso.
Drill 4: The Inside Takeaway Drill
Many slices begin with a poor takeaway. This drill grooves a better start to your swing.
Step-by-step instructions:
- Place an alignment stick in the ground about 2 feet behind you, angled toward your trail hip
- Address the ball normally
- On your takeaway, focus on the clubhead moving along the stick’s angle
- Feel like you’re taking the club back “inside” rather than straight back or outside
- Pause at hip height and check – the clubhead should be behind your hands
An inside takeaway sets up an inside-out swing path, the opposite of the slice-producing out-to-in motion.
Drill 5: The Trail Elbow Drill
This drill focuses on keeping your trail elbow (right elbow for right-handers) in the correct position to promote an inside path.
Step-by-step instructions:
- Take your normal backswing
- At the top, your right elbow should point toward the ground, not out behind you
- Start the downswing by dropping your right elbow toward your right hip
- Feel like your elbow leads the hands down
- This “slots” the club on an inside path automatically
- Practice this motion in slow motion before adding speed
When the right elbow works correctly, it becomes nearly impossible to come over the top.

Drill 6: The Closed Stance Drill
This exaggeration drill helps you feel an inside-out swing path.
Step-by-step instructions:
- Set up to the ball with your feet in a dramatically closed stance
- Pull your right foot (for right-handers) back about 12 inches from its normal position
- Your shoulders should still aim at the target
- Make swings and feel like you’re hitting the ball toward right field
- This closed stance forces an inside-out path
- Start with half-swings and gradually increase
- As the feeling becomes natural, slowly return to a square stance
Many players are shocked when their “inside-out” feeling actually produces a straight shot – that’s how ingrained their slice pattern was.
Drill 7: The Pause-at-the-Top Drill
Rushing the transition is a major slice contributor. This drill fixes the timing.
Step-by-step instructions:
- Take your normal backswing
- At the top, hold for a full second count
- During the pause, feel your weight shift to your lead foot
- Let your arms drop naturally before turning through
- Focus on starting down with your lower body, not your shoulders
- The pause prevents the rushing that causes coming over the top
This drill teaches proper sequencing: lower body leads, arms follow, and the club drops into the slot.
Training Aids That Help Fix a Slice
While drills are essential, the right training aids can accelerate your progress by providing instant feedback. Here are three proven tools:
1. Alignment Sticks
Alignment sticks are the most versatile training aid in golf. Use them for the drills mentioned above, check your aim, and groove proper swing paths. At under $15, they’re an essential investment.
Recommended: Callaway Alignment Stix
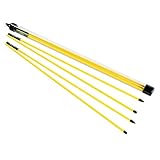
- Simple Golf Swing Aid: This set includes two 48-inch alignment sticks that can be configured multiple ways to help straighten your swing and improve your golf game
- Compact Storage: Each shock-corded steel alignment stick collapses to store in the included 19-inch plastic storage tube, which will fit in most golf bag apparel pockets for easy transportation
- Fundamental Golf Training Aids: This golf alignment stick set will help teach key fundamentals of set-up and ball striking, including alignment, ball position, and swing plane
- Multi-Use Golf Trainer: These golf alignment sticks are great for improving putting stroke and chipping, iron and driving alignment, and overall accuracy
- Our Mission: Callaway is dedicated to one thing-- making the sport of golf more enjoyable; We strive to innovate golf practice equipment, golf clubs, and golf accessories that improve your performance and up your game
– The industry standard, used by tour professionals and amateurs alike.
2. Swing Tempo Trainers
A weighted swing trainer builds strength while grooving proper tempo and sequencing. The added weight prevents rushing the downswing – a major slice contributor.
Recommended: SKLZ Gold Flex Swing Trainer

- INCREASE SWING DISTANCE: Exaggerated flex in the shaft helps create length in your swing, helping you gain more distance for more consistent and controlled shots on the course
- ESTABLISH IDEAL SWING TEMPO: Amplified shaft flexibility promotes a slight lag at the top of your backswing, establishing the perfect swing tempo and enhancing your clubhead position and movement awareness throughout your swing
- BUILD POWER & BALANCE: Weighted ball/head at the end of the shaft encourages proper weight transfer, building balance and power through impact, helping you master the right muscle sequencing for an efficient swing
- DEVELOP CONSISTENT GRIP: The built-in grip guide helps you develop muscle memory for the correct hand placement, ensuring a proper grip and consistent performance
- INCREASE SWING SPEED & ACCURACY: At 48"/40” in length, it's longer than a standard driver shaft, allowing you to develop greater swing speed and stay on plane for better ball-striking consistency and precision
– Builds strength and flexibility while ingraining proper swing tempo. The weighted end provides instant feedback on sequencing.
3. Connection Trainers
These aids keep your arms connected to your body throughout the swing, preventing the “arms away” motion that leads to an over-the-top move.
Recommended: Orange Whip Golf Swing Trainer

– Helps with tempo, balance, and developing a synchronized swing. The flexible shaft provides feedback on proper sequencing and prevents casting.
Common Mistakes When Trying to Fix a Slice
As you work on your slice, avoid these common pitfalls:
Aiming Left to Compensate
Many golfers aim left to account for their slice. This actually makes the problem worse by encouraging an even more out-to-in path. Aim at your target and fix the root cause instead.
Making Too Many Changes at Once
Pick one or two drills and focus on them for at least two weeks before adding more. Overwhelming yourself with changes leads to frustration and inconsistency.
Not Recording Your Swing
Use your phone to record swings regularly. What you feel isn’t always what’s real, and video provides objective feedback on your progress.
Expecting Overnight Results
Changing a swing pattern takes time. Most golfers need 3-6 weeks of focused practice before new patterns become automatic. Be patient and trust the process.
Final Thoughts
Fixing a slice requires understanding the underlying mechanics (open clubface and out-to-in path), then systematically addressing both issues through targeted drills. Start with grip adjustments and path drills, add training aids for feedback, and most importantly – be patient with yourself.
The golfers who successfully eliminate their slice are those who commit to consistent practice, usually just 15-20 minutes a few times per week. Pick two drills from this guide, work on them for two weeks, and you’ll likely see meaningful improvement.
Your straight, powerful shots are waiting. Now get out there and make it happen.